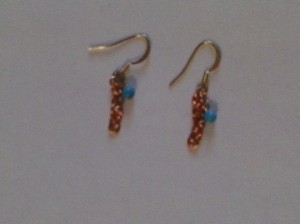
Above is a picture of my first finished chainmail project – six copper chainmail rings dangling down in a straight line, with a small, turquoise bead at the top and bottom of the chains. I decided to go with a pair of earrings, because I didn’t want to have to attempt to connect the two pieces of chain that had fallen apart the night before. I also wanted to just have a completed piece, so I could move onto something else and have my first completed chainmail piece under my belt. Overall, I like how it turned out! I was winging it with the earring design, and had to tweek it a bit here and there. After showing my Mom the earrings, she suggested to add another turquoise bead at the bottom of the chain to make the piece look complete, and I liked it. Before, it looked like this:

The earrings, with a bead only on the top of the chain
It was nice, but definitely was missing something so I’m glad I showed it to her for some input. Also was debating fixing the longer loop and ultimately decided to – it was scary for me to tinker with it because I was afraid I’d ruin the chain by cutting off the bead dangle, so instead opted to open the loop a little and slide the dangle off the ear wire. After I was done, it had a more professional finish.
There were some troubles along the way assembling this thing! I’ve never been a fan of making earrings because I hate having to thread the small pieces onto the ear wire and close them and possibly distort the piece (like by having one bead dangle longer than the other which happens to me a lot) but with the jump rings, it was a lot easier to thread the chain onto the ear wire. When I put the head pin with the bead dangle on there came the hard part. I really need to get a ruler or something so I can measure lengths and have consistent loops. The first earring was easy, but the second one I had to use three headpins before getting it to stick at the length I want it to. When I threaded everything onto one ear wire, it kept on falling off and I was freaking out that my jump rings weren’t closed all the way – but then the bead dangle fell off too, and at closer inspection the ear wire had been opened a bit, no clue how that even happened! It was majorly frustrating because the first headpin I had had both turquoise beads even and if I had noticed before I would have just fully closed the ear wire and been done instead of trying to re-adjust with a new headpin. Next time I’ll check every piece of the assemblage before jumping to conclusions, will probably make my life a lot easier in the long run!
It wasn’t easy, by any means to make the adjustments to the earrings – I fought a lot with cutting headpins to the right size, trying to thread them on with itty bitty headpin pieces left, and then not having enough of the pin to close. It was soooo annoying! And I wound up opening the ear wire again, but then that gave me an idea! Instead of trying to open and close the headpins, why not just thread everything onto the ear wire while it’s open and then close that? So I did and it worked perfectly! I will probably be using that as my earring making technique from now on because it was soooo much easier . A jump ring was a little open, but I luckily could close it enough so the second turquoise dangle I added to the bottom stayed secure. And as another alternative method, I decided to try not snipping the head pin until I made the loop, made sure it was closed and at the length I wanted, then cut off the excess. Worked like a charm and also will be another technique I adopt into my jewelry making arsenal!
And thus, ends my first Chainmail journey. It was very interesting to say the least, I think I learned a lot about being patient and staying persistent – the hardest thing about this whole experience was not giving up on a technique I’ve always wanted to learn, and I’m glad to say I stuck with it until the end of this small project. I also learned how to feel for the most part when a jump ring is closed, and how to keep my work from vanishing when I drop it. Also, to check all parts of the finished piece before going to fix it! XD
I was reading that the rhythm of chainmailing was very calming, and when I first started I was like “That article was cray this is so frustrating blarg!” but, when you get into the process and can do all steps of the technique well enough, it really is a nice way to get your mind off things and just zone into your work. Can’t wait to do more patterns with this technique and get better at it!
What will I do next? Why, practice chainmailing, of course! I still have a long way to go before being super special awesome at it, but I am happy to say my first chainmailing adventure has been brought to a close!
